Lori is back again with two more Couture projects, as promised. The first Lori describes as, "a very simple layout documenting my tulip love in the spring time and how I love to bring them in the house this time of year for a little SPRING inside!"
How did she do it? She "used samples from the paper collection to piece together to form a quilt together.... Love all of the colours in this line... so pretty and soft and perfect for spring layouts."
"I made my flower by accordion folding my paper and then layering it on top of a die cut accent and then adding some of the pretty embellishments from the Couture Sundries."
The second project for today, from Lori, are these pretty altered flowers. She says, I "made this flower bouquet from an altered kit I had from years ago. Just coverd some chipboard flowers with scraps of paper and then used all of the pretty buttons and brads as the centers. A very simple project but so much fun to make! I used my paper crimper to crimp my scraps and used them to fill the bucket."
"It is a perfect gift for mothers day as an extra splash of colour and the perfect type of flowers to give - the ones that won't die!!"
Thanks for the reminder, Lori! Mother's Day is a week from tomorrow. Is anyone making a gift this year? What is it? We'd love to hear your ideas!
This beautiful layout is the first of three Couture projects Lori created for you this month. We love all the tumble dye misting and painting techniques she used on this layout.
Lori says "This layout is featuring 2 quick photo's that were snapped of my DH and I on our family vacation in Florida last summer - just a month before our 20th anniversary... so I used them to document our anniversary together."
"I love the look of mist and paint on all of my layouts and I love that this paper had it already done for me!! I played a lot with the purple dye that was provided to me and used it on the canvas heart (with acrylic paint) and on my tags and journalling strips."
"I also experimented with the mist and sprayed the SEI acrylic letters... spread it around with my fingers and then let them dry overnight and it became a marble effect on the letters.. LOVE how cool they turned out!!"
Check back tomorrow for two more lovely projects by Lori. They are sure to get you excited about spring!
Let's get this party started! It's time to link up any project(s) you have created using SEI product. This is the perfect time to show off your layout for our sketch challenge too. If you haven't made anything lately, that's ok. You have a couple days to create a project or complete the challenge. The party will end April 30th at 11:59 pm.
Don't forget to...
1. Add a link to your SEI project on our blog by clicking on the button at the bottom of this post. Your project must use at least one SEI product to participate.
2. Link back to us by adding this button to the bottom of your blog post.
3. Check each other's projects out & leave comments.
Ever wonder how to tie dye? You may be surprised how easy it is with tumble dye. For those who aren't familiar with tumble dye, it is a ready-to-use water-based craft and fabric dye. Check out our new YouTube videos to find out how make awesome, personalized projects!
Audrey has two double-page layouts to share today. When choosing which papers to use on her layouts, she carefully considers the colors in her photos and uses papers that will compliment them. We hope you enjoy reading her thought-process in the papers and accents she chose.
FUN WITH FLOWERS
"There were so many busy colors in my photos that I needed to use a background that was dull so that the photos would stand out. I used some greys from Couture and some greens from Corinne. But to highlight what was going on in my photos, I used a lot of bright colored accents."
DELIGHTFUL DANDELIONS
"When I do pages, I usually use papers that are oppisite in color of my photos so that my photos pop off the page. But in this case, the colors of Sunny Day just matched my photos so perfectly that I had to use them, and my photos still stand out! I stamped a flower image with some grey ink on my background cardstock, and used some swirly metal accents and a pearl gem for the middle to add some 'movement' to the flowers."
Next time you are creating a scrapbook layout, don't forget to consider the photos you are putting on your page. Thanks for your insights, Audrey!
Lisa's Sunny Day cards make us so happy! We hope they will bring a little sunshine to your Monday.
She created a little scene using the Sunny Day die-cuts. The swirly rhinestone pattern looks like wind rustling in the trees.
This card was made especially for Lisa's daughter's birthday. Maybe you wouldn't think to mix craft paper with the bright flowers in the Sunny Day collection, but the contrast really makes the flowers pop.
The cut-out numbers really make the statement...This is a big birthday!
The last card is not only pretty, it also has a great quote from the die-cut accents on it. It's from Mother Teresa and reads "We shall never know all the good that a simple smile can do".
Now that Lisa has brightened our day with her cards, we can brighten someone else's day with a smile. Happy Monday!
Although Julie used the Couture collection for this layout, it isn't too feminine at all. She did this by choosing patterned papers that work great for either gender. She created a great color combo by accenting the neutral gray papers with splashes of green.
Club SEI's April kit features the Bookshelf collection, specially designed for club members! This kit is full of great colors and easy-to-use patterns for any age or gender. Click here to find out more about this kit. If you aren't a club member, you can still sign-up and receive it.
One thing we LOVE about Club SEI is all the great ideas. Every kit has instructions that spark creativity. Plus, there is an on-line gallery full of alternate projects and ways to use your leftover supplies. Today we want to share a couple more ideas, perfect for gift-giving.
This first one is great for moms or girlfriends. We decided to take the adorable caddie that comes with the kit and switch it up. We made our own flower embellishment for the front. Then we filled the caddie with some of our favorite things, wrapped in pretty paper bands. Simply wrap a plain potted plant to make it special. Done!
The second project idea is great for grads, dads, or anyone who likes money :). We used some origami techniques for this one. You can find the instructions for the money frames here and the take-out box here. The recipient of this box is sure to have great fortune!
Audrey's project for today is over-the-top amazing! She used so many different materials and techniques for this decorative Easter basket. So, we thought we would let her explain it in her own words.
"I was originally going to make my own basket design, but there are so many great tutorials out there, so why reinvent the wheel? I used a tutorial from this blog to make this basket, which I altered just a bit. I used some of the beautiful White Elegance papers for the basket and I added only one handle and a ribbon around the top edge. The butterflies are from the spring breeze accessory pack."
"For the 'grass' I used some tissue paper which I cut into thin strips, and then misted with some green 'tumble dye' which works just like a spray ink. I let this dry overnight."
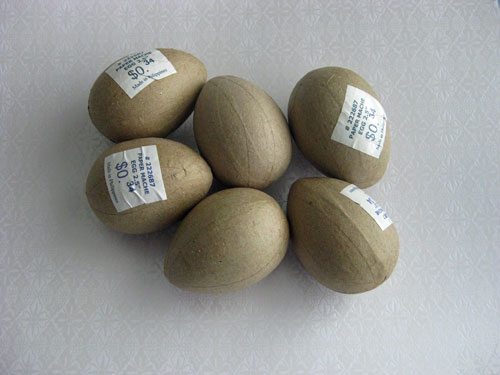
"The eggs are paper mache and I purchased them from my local Hobby Lobby. I painted them with a few coats of white paint. My initial intent was to cover them with strips of paper, which I attemped. But SEI papers are so high quality that you would have to use paper thin papers to cover the shape of the egg. So instead, I misted my eggs with some light pastel colors, and then punched some shapes from the purple and green papers of the Couture collection. I used a few coats of Mod Podge to make the punched shapes lie flat on the eggs. On the last coat, I added some glitter to give them a bit of sparkle. Once dry, I added some pearl gems from the accessory pack."
"Lastly, I made my little sign by pleating some papers and using some circle punches. Some tiny rub-ons letters for my sentiment went in the middle, and I attached all to a wooden skewer that I painted white!"
Thanks for all of your comments on Marcy's awesome posts last week! We are ready to announce the giveaway winner now... The number, as selected by random.org is...
Congratulations Jodi! Please send your mailing address to seiblog{at}shopsei{dot}com so we can send off your goodies.
TGIF! Thanks for hanging out with me all week everyone! I had a blast! I hope you'll pop by my blog (www.marcypenner.com) and visit.
Today I have one more layout to share with you... my favorite out of the bunch! When we go down to Florida we plan to visit the beach at least once. But even still my boys are totally fine with playing in the condo sandbox! Ha. Go figure.
I used some more of the On the Coast line for this page. I'm in love with that grey dot paper! I'll be using it for quite a while I imagine! I'm also addicted to making little banner tags. Sigh. One of my favorite things is how subtle title works with the light blue paper. Love that! Probably one of my favorite layouts to date!
So, thanks again for having me SEI! I had a blast!
Marcy
Thanks Marcy! We have learned so much this week about you, paper-crafting, and photography. You have such a great style and fun personality.
GIVEAWAY ALERT! Would you like to win some of the paper-crafting products Marcy used this week? Ok. Just leave a comment on this post by Sunday, April 17th at midnight MST. Tell us which of Marcy's posts was your favorite this week...if you can choose just one! The winner will be announced Monday so check back then.
Thanks for hanging in there with me everyone! It's been a great week so far!
I live in an old (120 year old) farmhouse. We've been renovating and decorating for over 10 years now. I love decorating. I love my house and making it a home is a big part of who I am!
I've had this project on my to do list for a long long time. I've loved random cut letters in banners and as art for a while... they're just so charming. I don't have the wall space for something large so I made some small ones instead. I planned to frame them at first (the colors worked so well for my daughter's room) but I decided to attach them to the mirror as little inspirational messages instead.
I considered “Smile” and “Go Get 'Em” among others but finally settled on “It's Nice To Be Nice”. A little funtac and the bedroom mirror is all dressed up! I totally forgot about the layered effect the mirror would have on the letters, but it's really cool!
I plan on switching this up often with different phrases and reminders! A very cool and simple addition to our home.
I will be the first to admit that I find cards challenging. I'm not sure what it is. Maybe the small scale? Maybe the shift from a square canvas (like my 12x12 layouts) to a rectangular one? I don't know. But I needed some cards so I gave it a try. Plus, those Corinne papers were too cute to resist!
I really love how the “varnished” paper accepted ink! The pattern resists beautifully. Give it a try sometime!
Hi there everyone. I'm back with a layout to share. The minute I saw the On the Coast line I knew it'd be perfect to highlight photos from our recent Florida trip. I especially love that there's so many lovely subtle patterns that compliment the more bold ones in the collection. I added some old SEI letter stickers (from Dill Blossom). The color just matched perfectly!
I really like companies that put out pretty packaging too! I couldn't resist punching into the white with blue circles for one of my hearts!
I have so many vacation photos to blog and scrapbook yet. I'm sure this collection will find itself on many more pages! Marcy
Hi there everyone! Let's get this week started with a photo tip.
Sometimes you just can't control your background (or your subjects!). A few weeks ago we took our little family on a trip to Florida. We love visiting Old Town at least a few times while we're there. While we were there my littlest decided to pick up some bird seed from the ground and feed the birds. Now, if you're the mother of a little boy you'll understand that they don't sit still long. So I knew I had to take the opportunity while he was sitting still to take a photo. The problem was that I didn't have a say in where he stopped. The background was less than ideal. If I would have taken the shot as is I would've been left with a lovely view of the parking lot. Not cute.
There was no way I was going to ask him to move... he'd never sit still again! So I had to move. A simple change in perspective and you can get a shot like this...
I simply stood over him and let the sidewalk be my background instead. Much less distracting.
So next time you're taking photos, try moving yourself instead of your subject! Marcy
We are thrilled to introduce next week's guest blogger, Marcy Penner. She is a lady of many talents, including home decorating/renovating, photography, scrapbooking/paper-crafting, and blogging! She has a great week lined up with tons of creative ideas so be sure to check back soon. Until then, swing by her blog, an inspired life.
Hi there! My name is Marcy Penner and I'm super excited to be guest hosting the SEI blog next week. We'll start it all off on Monday... but for now, here's a little bit about me.
I'm married to my high school sweetheart and we live on the family farm on 22 acres in Canada. We're still busy renovating our farmhouse. Right now we're almost done our kitchen. I can't wait for it to be done! When I'm not busy working on the house I'm scrapbooking or taking pictures of my kids (when they let me). ;) You can also find me over blogging over at www.marcypenner.com.
So, that's that. Have a great weekend everyone, and I'll see you back here next week!


