Showing posts with label guests. Show all posts

Friday, October 8, 2010

Guest Blogger, Jessica Christian

Today we are happy to introduce Jessica, next week's guest blogger. She is the creative talent behind the blog Craftiness is not Optional. Hop over to her blog and check out all of her amazing sewing projects. Then come back next week to see the spooky creations she has been making to share with you.


Helloo there. I'm so excited to be guest posting this week here on SEI Lifestyles!


My name is Jessica (you can call me Jess, cause we're tight like that), and I like lots of things.

I like to sew. That's an understatement. If I don't sew on something every day-I get twitchy and grumpy. My favorite things to sew are clothes for my kiddos! I didn't always like to sew. My mom tried to teach me while growing up-and that always ended up in some kind of argument, and tears of frustration from me. (I'm not a patient person) I'm now mostly self-taught and love to figure out how things are made.

I also love to scrapbook. It's gotten pushed to the back burner a bit since the Great Sewing Takeover of '08, but I still do it! (my 20+ albums full to the brim prove that) I love hoarding paper. and letter stickers.


I love my two A-dorable daughters, Sadie and Charlotte-and my awesome hubby who puts up with patiently supports my crafting/sewing impulses. We live in northern California and love it-both of us grew up here and our families are here-we love being so close to both sets of grandparents. (baby sitters galore!)

I love to watch TV and movies-but most of the time, only while sewing-two birds with one stone and all that. I love making tutorials. I love taking pictures but am only mediocre at it. I loooove chocolate. and french fries. But not together. I love to sing-but only in the car, with only my kids present. I love to pay bills. (not! just making sure you're paying attention!) I love the color teal.

I guess that's about it. ish. I'm looking forward to this week! I have some fun stuff planned-some tutorials and a yummy recipe...stay tuned. :)

Friday, September 17, 2010

Monst(e)rous Frame + Giveaway [CLOSED]

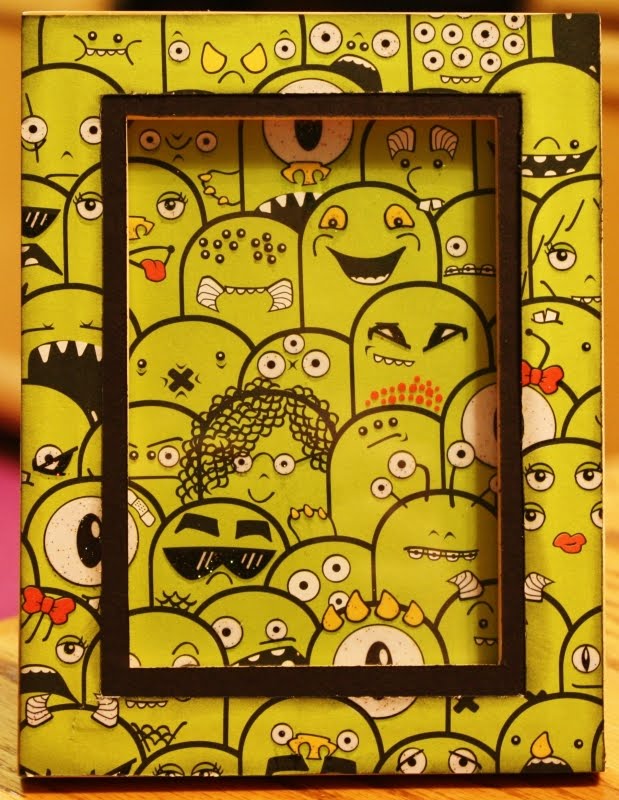
Today is my final day with you as a Guest Designer and I have saved my favorite project for last! I found this little wood frame on clearance and immediately thought of the Monsterville Monster Mash paper! My intentions were to cover the frame with the monster covered paper and add in a cute photo and put it in my son's room...note I said "intentions"!


I began by tracing the frame base on the back of the Monster Mash paper and then I centered the frame stand backing and traced again, cutting out the frame and the center. The frame stand backing is typically larger than the window which allowed me to add a black mat.


Then I adhered my Monster Mash paper to the wood frame and covered with several coats of Mod Podge. I used the inside cut of the frame inside the window, so the paper patterns line up. This was going to be the photo mat...but as I finished up this project I realized that I love it just the way it is!


Currently this frame is sitting in my art room, where it will remain until my son (my #1 fan) talks me into allowing him to have it for his room! :)
I have had so much fun sharing my projects and want to give a big "thank you" to SEI for having me!

keep creating...Jamie


Don't worry you don't have to say "good-bye" to Jamie forever because you can hop over to her blog, Bits of Paper, anytime. Isn't she a delight? We have really enjoyed having her this week and loved all of the creative ideas she shared. Thank you, Jamie!!


If you would like to win some Monsterville goodies, leave a comment on this post by Sunday, September 19th at midnight MST. Please tell us which post was your favorite this week. We will announce the winner Monday. Be sure to check back to see if you are the winner because if we don't hear from the winner within a week we will pick a new one.

Although the giveaway is now closed, we are sure Jamie would still love to hear what you think. Feel free to continue leaving comments on this post.

Thursday, September 16, 2010

Halloween Card and Spooky Shirts!

It feels much like Fall here in Michigan! It makes me want to pull out all of my Halloween decorations, find warm apple cider, and pick pumpkins and apples! I still have a couple more weeks so to hold me over until then, I have been playing with the Spooks collection from SEI!


Supplies:
Pattern Paper: Spooks Collection (SEI)
Cardstock: Black (Recollections)
Sticker: Spooks Collection Cardstock Stickers (SEI)
Border: Spooks Collection - Stars (SEI)
Ink: Charcoal (Cat's Eye Chalk Ink)
Punch: The Paper Studio
Stamp: Studio G
Misc: Twine

And you know what else I have been playing with? More Monsterville! Did you know that SEI has iron-ons? Did you know that they have them in the MONSTERVILLE collection!?


Seriously...you can build your own monster on your own shirt! You get to pick the monster arms, eyes, mouths, and more, it just doesn't get better than that in my book! Here are my monsters, wearing their monsters! :)


I'll be back tomorrow with another Monsterville project!

keep creating...Jamie

Wednesday, September 15, 2010

Cards from the Monsterville Collection

Today I want to share with you a couple cards that I have created from the Monsterville collection!

First up is a my "Eye" Miss You card (hehe)!


Supplies:
Pattern Paper: Monsterville Collection (SEI)
Cardstock: Black (Recollections)
Sticker: Monsterville Collection (SEI)
Pen: White Gel (Sakura)
Punch: EK Success Border and Zutter Corner Rounder
Misc: Ribbon

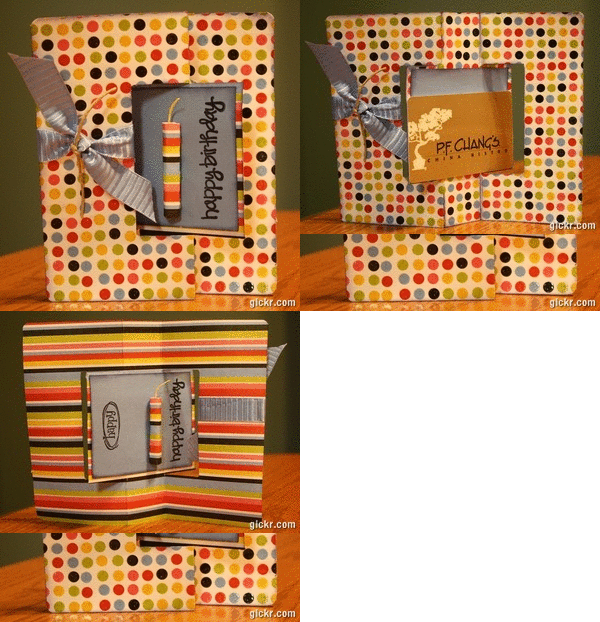
And next up is a Happy Birthday (Swing) card! I have a template that you can download as a PDF or as a cut file for the Cricut in one of two cartridges (George -or- Plantin Schoolbook) so that you can create your own!


Supplies:
Pattern Paper: Monsterville Collection (SEI)
Ink: Cat's Eye Chalk Ink
Stamps: Clear G
Misc: Ribbon and Twine

I am returning tomorrow with a Halloween Card and some spooky shirts!

keep creating...Jamie

Tuesday, September 14, 2010

Never Too Old


Yes, it is a layout from the Monsterville collection just as I said it would be! I love how versatile this collection is, which is why it is one of my favorites! The papers match perfectly with or without the monsters and the colors are so bright and bold! Did you see those little icons to the side of the photo? Those are actually cardstock stickers that I put on tiny black mats and then popped up with foam squares! Super cute!

Supplies:
Pattern Paper: Monsterville Collection (SEI)
Cardstock: White and Black (Recollections)
Stickers: Monsterville Cardstock Stickers (SEI)
Alphas: Momenta
Ribbon: American Crafts
Button: American Crafts
Punch: EK Success
Font: Corinthia (Cut with SCAL)
Pen: Multi-liner SP (Copic)
Misc: Fiber

Tomorrow I will be back with a couple cards featuring more Monsterville!

keep creating...Jamie

Monday, September 13, 2010

Play Day Baby Gift Box

One of my all time favorite SEI collections is Play Day!
I love the adorable little animals and all the coordinating prints.


Today I am going to share with you how to create a gift box using this line! To begin, you will need one 12"x12" sheet of paper for the main box and a 4"x12" coordinating sheet of paper for the wrap.

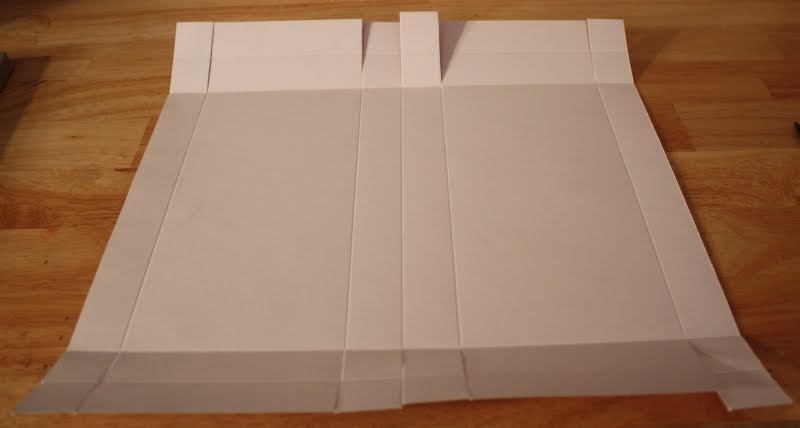
With the 12"x12" paper, score at 1", 5", 6", 7", and 11"

Turn your paper and score again at 1", 2", 10", and 11"

With the score marks you just made, cut up to the 2nd score mark (as shown below) on both sides. These will be the flaps.

Next, fold the center score marks to form a peak. You will have two sides of the box, a top and a bottom:

Place adhesive on all of the flap areas:

Pull in the side flaps on the top part of the box and then fold the side flap down. You will do this twice on the top and then twice on the bottom.

Your box should now look like this:


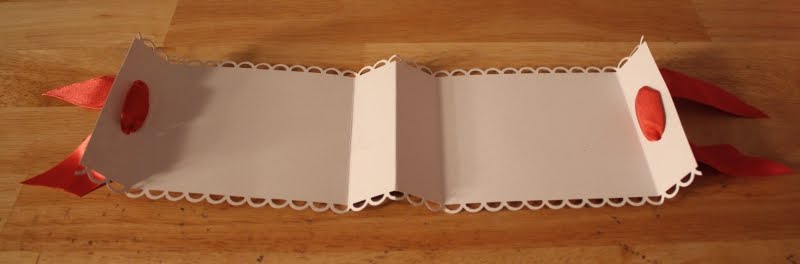
Next we are going to make a wrapper with the 4"x12" coordinating paper. I used a border punch on the two long sides of the paper. You will need to score the wrapper at 1", 5", 7", and 11". Again, the center score marks will need to be folded to form a peak. This will adhere to the peak of the box.

Punch two holes on each side flap and insert ribbon as shown in the photo above.
Place adhesive throughout the back of the wrapper and adhere to the box, centering.

I cut two pieces of twine and then gather the ribbon (a piece from the bottom and a piece from the top) then tied a bow in the twine to close the box. All that is left is to decorate the top of the box! I used a kangaroo from the paper and placed foam squares underneath him then adhered him to a coordinating cardstock piece!

This box is great for a tiny outfit, some onesies, or even a receiving blanket!
Be sure to stop by tomorrow for a layout using the Monsterville collection!
keep creating...Jamie

Friday, September 10, 2010

Guest Blogger, Jamie Cripps

Please welcome our guest blogger, Jamie Cripps. She will be filling next week with her sweet personality and a variety creative projects. So please stop by her blog, Bits of Paper and say "hi". Then come back next week to see what she has in store and enter another giveaway!


Hi! I am Jamie Cripps and I am super excited to be here as a Guest Blogger for SEI Lifestyles. I have been a big fan of SEI and their products for quite some time, so this is a true honor!


I live in Michigan with my craft supportive husband of almost 12 years and our two children. I was introduced to scrapbooking with my daughter was born 10 years ago, but it wasn't until our first Disney vacation in 2006 that I became obsessed! I love capturing the little things of our lives; the funny sayings, the adorable memories, the everyday moments! I also enjoy making cards and creating anything I can with paper and glue! I currently design for Scrap Withing Reach, P K Glitz, ScrapbookPal.com, and Momenta as well as designing and teaching for my local scrapbook store, Scrap Tales!

I began blogging just over a year ago to share my love of paper crafting! I never would have dreamed that starting a blog would have changed my life so drastically! I truly love the blogging environment and community!

Five things about me:
1. I was raised in a small town in Kansas (and hope for the day when we can move back).
2. I dream about designs, layouts, and ideas and keep a tablet and pen next to my bed...I even draw in the dark at times, which
makes for a great giggle in the morning!
3. I am a geek. I love technology, spreadsheets, organizing, the alphabet, and sticky notes!
4. I do not need coffee to be this peppy, it just comes naturally.
5. I believe that smiles are contagious and I think we all should wear them daily!
I am excited to share with you projects that I have been creating with the oh-so-cute Monsterville collection and the Spooks collection so make sure you come back!

keep creating...
Jamie

Friday, August 20, 2010

4 Layouts with 1 Kit + Giveaway [CLOSED]

Hmmm, what more can we create together with all things SEI? Well, I had never tried a page kit before and wanted to see if I would like the concept.


I loved it! Every single sheet of patterned paper, ribbon, die cuts and embellishments used on these layouts today were included in the kit. I didn’t add anything extra to complete these scrapbook pages.

Here is the instruction sheet that comes in kit so that you’ll see that I followed the sketches pretty closely, with just a few variations.


I don’t usually use sketches, but felt very comfortable using the suggestions of the SEI designers. Wow, it’s all there, including labels on the backs of all the papers and die cuts so that I knew exactly where to place each item.

Here are my first two layouts:


Since the “best friends” die cut was originally in pink, I used my brown marker and wrote over the words to better coordinate with the page {especially since my son was in the photo!} I felt okay using a floral pattern on this page since Zach’s girlfriend was in the photo and with the brown and green, it didn’t feel overly girly. I roughly sewed the brown ribbon included with the kit and purposely frayed the edges. I loosely interpreted the sketch due to my photo being a 6x4 rather than a 4x6 as in the sketch.


For my son’s Prom layout, I changed the placement of the ribbon from vertical to horizontal and used it to thread through the “happy memories” die cut.


And boy did I put those stickers to good use. The two green journaling spots on the right hand side were once one sticker, which I trimmed. I did the same thing to the brown journaling spots at the top and bottom of the layout. The extra piece of the brown-edged journaling spot was used as a tab in the upper left-hand corner of the layout.


The glittery curved stickers are what was left on the sticker sheet when I removed the journaling spots. I trimmed them and adhered them to my page.

And my next two layouts:


My oldest daughter loves all things pink and girly and so does her school friend, making this patterned paper a perfect match! I changed the orientation of one of the photos and fussy cut around some stickers, which I adhered with pop dots for dimension, but the feel pretty closely matches the original.


With my next layout, I used the die cut “friends” tag as part of my title. Again, I fussy cut around some of the stickers and added them to the page with pop dots. I like that the sewn borders around the page and the circle dies are anything but perfect. This just might be my favorite layout of the four. As a matter of fact, I might even scraplift it and make the same page for each of the kids’ albums!


Can you believe it, there were extra embellishments left after making four complete layouts. I challenged myself to use every last bit of the kit, and I did. Want to know what I created with all the awesome extra bits? SEVEN greeting cards! And if you’re wondering where that yellow patterned paper came from, I cut it from behind the brown paper of the first layout I shared with you. Why waste that pretty paper behind another piece of paper...put it to good use!


Thank you for allowing me to guest blog with you at SEI LIfestyles this week, I appreciate your kind comments and I thoroughly enjoyed crafting with you. If you’d like to see more of my projects, tutorials and downloads, I invite you to browse my blog, www.iloveitallwithmonikawright.blogspot.com anytime.


Wahoo! We love how smart Monika is about using scraps and pieces. It was pretty neat to see how she adapted the page kit to fit her style and photos.

Wasn't it a great week? We can hardly believe how many great projects she came up with in such a short time. Don't forget, if you want to see more of Monika's creations, stop by her blog, i love it all. Thanks a million, Monika!


You can play with this page kit too. In fact, one lucky person will win it and some of the other goodies Monika used this week. To enter, leave a comment on this post telling us which post was your favorite this week by Sunday, August 22nd at midnight MST. We will announce the winner Monday. Be sure to check back to see if you are the winner because if we don't hear from the winner within a week we will pick a new one.

This giveaway is now closed but feel free to continue to leave comments for Monika.

Thursday, August 19, 2010

Back to School

It’s already back-to-school time here in East Tennessee, my daughter is already in her 3rd week of classes. We’ve had her ready-to-go for weeks. My youngest daughter is still at home, she missed the Kindergarten cut-off by 6 weeks. That means we have another year of what we call “Mommy School.” Even so, I made her the same items I made for her older sister.


To decorate back packs, or a Library Day book bag as I did for Victoria, look for the self-adhesive luggage tags available almost everywhere.


Using your favorite patterned paper collection, I used the Happy Day paper pad and Glitter Sprinkles, embellish your tag. I decided upon a paper strip at the top of the tag. After I punched a flower shape and backed it with a scrap, I turned it over and covered that scrap paper that was covering the punched flower shape with a Glitter Sprinkle.

{It does have a phone number, I just blurred it for privacy.}

You’ve all heard of lunchbox notes, I’m sure.


My daughter eats at school, so I made her some “backpack” notes, instead. The coupon tucked inside Isabella’s backpack last week said, “Good luck on your test. You’re always a superstar to us.” That note had a star shape punched out.


This note for Victoria will award her a special treat of a Cherry Limeade from Sonic. We’ve begun work on her sight words and she’s doing so well!


If you guessed that this as an upcycled mint tin, you’re right. Go ahead, look for your empty tin now, I’ll be waiting when you get back. With a little measuring, a little trimming and a little embellishing, you will have created an adorable place to stash notes of encouragement and love.

Here’s a look at the inside of the tin. Oh, and the back has a piece of patterned paper to cover what’s printed there.


And just because I couldn’t stop there, I’ve embellished a hair clip that had lost it’s adornment. Again, I used the double-sided flowers that I showed you in Monday’s post and some rhinestones from the Jocelyn collection beaded frill and a mixture of Happy Day and Jocelyn papers to make this hair clip fit for a 2nd grade princess!


Tomorrow is my last day, but no fear...I have 4 layouts to share with you!

Wednesday, August 18, 2010

I Love Mini-Albums

Let’s all say it together...I love mini-albums! There, doesn’t that feel better?

This post is packed with 3 mini-albums and a bonus project, too, so let’s get this Wacky Wednesday started.

I’m going to start off with a 4x4 mini I made for my youngest daughter. As I was getting ready to photograph the album, she sat down and started looking through it. Half way through, she excitedly said, “It’s all about me!” A girl after her scrapbooking Mommy’s heart.


I embellished my front cover, which is painted canvas with a “just be you” rub-on from the Jocelyn collection, which I cut it down to a different configuration to fit the cover. The starburst swirl is part of the beaded frill also from the Jocelyn collection. I used my Crop-o-Dile to insert a grommet through which I strung my beaded chain, my Victoria hang tag, and some SEI ribbons.


Her nickname is Spunky, if that tells you anything and I used that description as my starting point, choosing a different characteristic of hers for each page. All but one of the pages came from the Jocelyn collection 6x6 paper pad. For the inside front cover, I used paper strips left over from cutting the 6x6 papers down to 4x4 to make my own pattern of SEI papers!

Here are a few more pages:


For this mini-album, I trimmed down some notebook paper to 6x6 and rounded the two outside corners. Here comes the fun part...using your favorite 6x6 paper pad, I used the Jocelyn collection again, choose two coordinating prints. Adhere the papers back to back.


Choose a rub-on image and adhere to a sturdy piece of cardstock, then trim around the image. Using a punch, punch a hole in what will be your front cover so that you can thread your SEI ribbon through. Before threading through the next hole, attach another punched piece of cardstock to the inside front cover before threading through the next hole, ending up back on the front cover. Tie a knot in your ribbon, adding the cut out rub-on image as an embellishment.


Now choose two other patterned papers from the 6x6 paper pad and added a punched tab to the top of each paper. These will be your sections.


I plan to use my mini-album journal for all of the sign-ons, passwords and other technical info I need to keep handy now that I am blogging. I already have a notebook that I’ve been using, but recently came to the realization that I shouldn’t give away all the stuff I make, I deserve some pretty things, too. So, I challenge you to do something nice for yourself today. Go ahead, just do it!


Hmmm.... Are you wondering what this 6x6 mini-album could be? The cover probably gives it away, but I’ll tell you anyway. It’s an address book.


My handwriting is not very dainty at all, so I made sure when I designed this address page that there was plenty of room to write all your information. I even included room for an e-mail address and a cell phone number. Oh, and the left margin is wide enough to use your Bind-it-All, binder rings, ball chain or ribbon to keep it all together. You could even punch holes and add it to a 6x6 scrapbook album.


Now, you’ll want two pieces of patterned paper approximately 5.25” long and 2.75” wide. Additionally, you’ll need a piece of coordinating paper measuring approximately 3.50” long, which you’ll fold in half. I used a punch to embellish the edges of this piece. Adhere the two long pieces to the one shorter piece to make a cover for your note pad.

Take 2.75” x 11” long strips of paper and fold in half. Using your 1/8” hole punch, punch two holes through the paper and the cover. I used embroidery floss and sewed through the holes several times to bind the pages and the cover together. Choose your favorite Glitter Sprinkles die cut accent and, using a pop dot, adhere it to the front of your note pad.


There’s no excuse for us not to be organized this school year, is there? Speaking of school, are you up for a few back-to-school projects tomorrow? I hope the answer is yes...yes...yes, Monika, we are!


NOTE:
If any of you are interested in having the address book pages as download, leave a comment on the SEI Lifestyles blog. If there’s enough interest, I’ll do a post and offer the free download on my blog, i love it all, next week.
 

newsletter | shop sei

Free Blog Counter

Pin It button on image hover