Showing posts with label fashion. Show all posts

Thursday, February 9, 2023

Frozen Tie Dye Project

 We thought it would be fun to see what happens if you freeze SEI tie dye and let it melt on a damp shirt. Lucky for us our tie dye is water-based. So, this little experiment was possible.

We think the results are pretty cool. It reminds us of one of those neat speckled eggs. Perfect for springtime!


We froze the dye in ice trays and placed it on a scrunched up damp shirt. After the dye melted into the shirt, we scrunched it some more to create this effect. 

Then, we air dried it flat and ironed it to make it permanent.

That's it! What do you think? Would you like to try some tie dye experiements?

Tuesday, January 24, 2023

Pastel Tie Dye T-Shirts

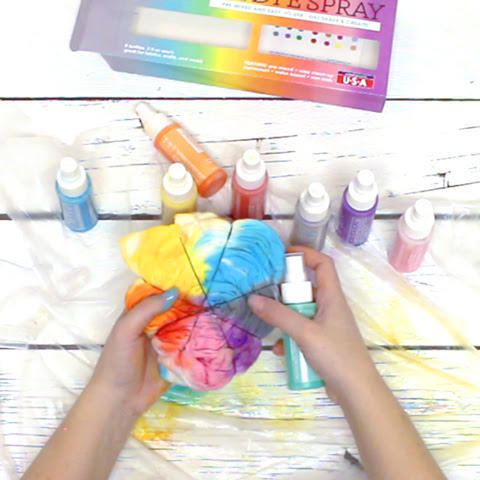
 We are so excited to make projects with our new tie dye kits! So, here are a couple of t-shirts we made with the cotton candy and playful pastel kits.


We made a classic spiral shirt using the playful pastels kit. This time we decided to have the spiral begin on the side instead of the center.

If you don't want a lot of white space, make sure to spray a little dye into the folds. We loved how it turned out!


Don't you just love the colors in this cotton candy kit? We do! For this shirt, we decided to do kind of a striped design.

What do you think of these new kits? What would you make with these colors?

Tuesday, August 23, 2022

Tie Dye Shoes

Our neon tie dye kits are so vibrant and fun! Also, they are on SALE this week. 😀 So, we decided to make some tie dye shoes.


These were a lot of fun to make! All you need is some plain white canvas shoes. We picked these up at Walmart for about $13.


We lightly sprayed the shoes with water to help the colors blend. Then, painted on the dye. After we let them air dry, we heat set with a dryer and iron. To make them last even longer, we let them dry on a very hot day in the sun and sprayed them with shoe waterproofer.


What do you think? Would you wear them?

Tuesday, July 26, 2022

How to Tie Dye Shorts

 Summer clothes are on clearance where we live. So, we snatched up these white shorts to use with our new playful pastel tie dye kit (which is on sale this week, BTW).


These would be super cute with a plain white top!


If you want to make some for yourself, you will need tie dye, a plastic bag, white shorts, and an iron.


Protect your space with the plastic. Then, dampen your shorts with water, squeezing out excess water. Scrunch up the shorts to prepare for the dye.


Spray a few colors of dye. We chose to start with the warm colors first.


Lay the shorts flat again. Scrunch the shorts again, pulling some white areas to the top.


Spray a few more colors of dye. We did the cool colors next.


Lay the shorts flat again. Scrunch up smaller areas that need a little more color and spray to fill some white spaces. Then, repeat on the other side of the shorts.


After the shorts completely air dry, iron to heat set. That's it, they're done!

Monday, November 8, 2021

Natural Fade Tie Dye Projects

 We love fall! Maybe it's not typically the time you think of tie dye. But, we created this natural fade kit a while back and we love these colors for fall, especially the mustard, sage, and orchid.

Aren't these colors lovely?


The first project we made was a t-shirt. This traditional spiral would be so fun to do with a cute white hoodie too!


We started with a damp t-shirt, twisted it into a spiral and divided it into 8 sections

Then we sprayed one color into each section and let air dry completely. 

Don't forget to iron to heat set the colors once it's completely dry to make them permanent.

We love how the t-shirt turned out and decided to do a little bag too. 

The process is pretty much the same. But, instead of a spiral design, we tied this one in straight lines.


The last item we dyed was a plain white baseball cap. Instead of tying this, we sprayed the dye directly on the hat. Which project is your favorite?

Monday, October 4, 2021

Tie Dye Halloween Leggings

We love doing fun holiday tie die projects. So, we decided to make some Halloween leggings this year.

We are really happy about how they turned out and would love to try some more Halloween tie dye projects.


For this project, we used some creamy heather leggings, orange and black tie dye, elastics, and an iron. First, we got our leggings damp so the dye would blend well.


We decided to do the spiral method. But, rather than starting our spiral on the center, we started it on the upper side of one leg.


Keep spinning your spiral around until the leggings are in a circle like this.


Wrap elastics around dividing your leggings into 6 pie-shaped sections. Alternate spraying orange and black on each section. Don't forget to spray the back also.


Once your leggings are completely air dry, you can open them up and heat set by ironing throughly. That's it! Done! What do you think?


Happy Halloween, everyone!

Wednesday, September 15, 2021

Fall Shirt DIY Autumn Leaves and Pumpkin Please

Fall is coming right up! We love the sights, smells, and sounds of fall. How about you? 

When we saw this adorable shirt saying, we knew we had to make a shirt with our cute iron-ons.


For this project we decided to mix two font styles, type and honey.


First, cut out the letters you want to use.


Arrange your letters to decide how you want them placed.


Place each letter individually and iron into place. We used a piece of paper as a tool to help us line the bottom of the letters up straight.

Peel off the film after ironing each letter on.


That's it! What do you think? Would you make a shirt with this saying or something else?


Happy fall, y'all!

Thursday, March 18, 2021

DIY Custom Glitter Letter Shirt for Easter

Easter is coming right up and if you've got a little baby around, this might be just the project for you. If you don't, what other cute things could you spell with these itty bitty glitter letters?

These custom onesies make great baby gifts! Use the letters to spell whatever you'd like. It's so fast and simple to do.


The 3 supplies you will need are iron-ons, an iron, and a onesie.

First, peel the letters you want to use from the backing sheet and arrange them on the onesie how you'd like.


Next, place the film provided in the kit over the letters. It should be matte side down, glossy side up. Don't worry, this film is heat resistant. It may wrinkle a little bit. But, it won't melt (unless your iron is way too hot and you leave it on too long). Press firmly for about 45 seconds.


You may also choose to iron the back of the shirt, just to make sure those letters are adhered well.


We love these glitter letters. They also come in turquoise, gold, and silver.


Happy Easter!

Thursday, March 14, 2019

DIY Velvet-Lined Gift Box

We wanted to make a gift box for these pretty pressed-flower necklaces and found the perfect way to make it more plush and fancy... velvet paper! We are majorly crushing on the velvet trend right now.


To start, we made a simple box out of papers from our Penrose paperpack. Then, we cut velvet paper to line the inside.


For the flower on top, we cut a bunch of little flowers out of velvet paper, using our Silhouette. Then, we added some velvet leaves and adhesive pearls.


The necklaces are from one of our favorite Etsy shops, Wylde Wanderer. What do you think of this velvet-lined box? Are you loving the velvet trend too? We hope so because we have some more velvet projects coming soon!
 

newsletter | shop sei

Free Blog Counter

Pin It button on image hover