Happy Halloween Everyone! We hope you are having a fun weekend.
Today we want to share a halloween wall hanging idea from one of our design team members, Audrey Yeager. This is how she did it...
"I made this wall hanging by take a 8x10" canvas board and covering it with pages from an old dictionary using Mod Podge. I then painted the edges black and added some glitter while the paint was still tacky. I used a piece of paper from the 6x6" Spooks pack and cut out some elements from the border strips. A ribbon on the bottom and another stapled to the back for hanging complete this simple project!"
We hope this will get you excited for next month. November we will begin featuring the projects our new design team has been busy creating for you.
We hope you have been creating some SEI projects to link up this month. If you didn't, be sure to create something for next month.
1. Add a link to your SEI project on our blog by clicking on the button at the bottom of this post. Your project must use at least one SEI product to participate. 2. Link back to us by adding this button to the bottom of your blog post.
3. Check each other's projects out and be sure to leave lot's of comments.
You have until October 31 at 11:59 pm MST. So, let the party begin!
We hope you're ready for some more Spooks layouts! First up, since Halloween is right around the corner, we thought we'd show you a layout that is perfect for this time of year. Doesn't that house look like one where you would like to go trick-or-treating? We love how Pia cut around the top of the headstone to tuck in the picture. This works great when you don't want your picture to completely cover up a pretty design.
Next up we have another Spooks layout. Yes, we said Spooks! You may already know but we really love to think of different ways of using our paper collections. Those sweet little sheep baby is counting are actually beadazzleds. They iron-on to different surfaces and have a great texture and shine because of the layer of beads on the top.
Our next linky party is coming up soon. We hope you have been creating some fun layouts and projects of your own to share!
Club SEI's November kit features Birds of a Feather. This collection of papers and embellishments was designed especially for club members. Click here to see what club members can make with this kit. If you aren't a club member, you can still sign-up.
We love all of the great calendar and countdown ideas that come with the kit. However, some club members might want to do something completely different, like make some holiday projects. That's what we did! We made this layout, card and goodie bag with some of the contents of the kit.
Thank you for commenting on Jessica's posts last week. It was a treat to have her share her talents with us! We ready to giveaway some Spooks goodies to the winner, as selected by random.org, who is...
Congratulations, Tracy! Now just send us your mailing address at seiblog{at}shopsei{dot}com so you can enjoy your prize.
They're also easy to make with paper-I used some twill tape and paper triangles for this one-from the Spooks line.
Just had to share the bunting/garland/banner love. What DO people call them?
Thanks for having me this week-I had a blast! :D Jess
Thanks a million, Jess! You so talented and we have enjoyed having you this week. We really appreciate all of the great ideas you shared with us.
Readers, be sure to stop and visit Jess at her blog, Craftiness is not Optional for more fabulous ideas. Would you like a chance to win an assortment of some of the Spooks goodies, including the glittering ghosts Jess used? Then leave a comment on this post by Sunday, October 17th at midnight MST. All you need to do is tell us which post was your favorite this week. We will announce the winner Monday. Be sure to check back to see if you are the winner because if we don't hear from the winner within a week we will pick a new one.
Although the giveaway is now closed, you are still welcome to leave Jessica comments.
1 15 oz can pumpkin 4 eggs 1 cup vegetable oil 2/3 cup water 3 cups sugar 3 1/2 cups flour 2 tsp baking soda 1 1/2 tsp salt 1 tsp cinnamon 1 tsp nutmeg 1/2 tsp cloves 1/4 tsp ginger
Preheat oven to 350 degrees. Grease 3 bread pans. Mix all ingredients together and pour into greased pans. Bake 50 minutes or until inserted toothpick comes out clean. (Also makes 5 mini loaf pans and one regular size loaf)
I wrapped the load pans in wax paper and then cut strips of paper to pretty them up.
The larger strip was 3.5 inches wide and the skinnier one was 2.5 inches wide, both by 12 inches. I used paper from the Spooks line-which was perfect for the pumpkin bread-since it has little pumpkins on the paper. Ah, too cute!
Add a little label and you have a cute little neighbor/friend gift!
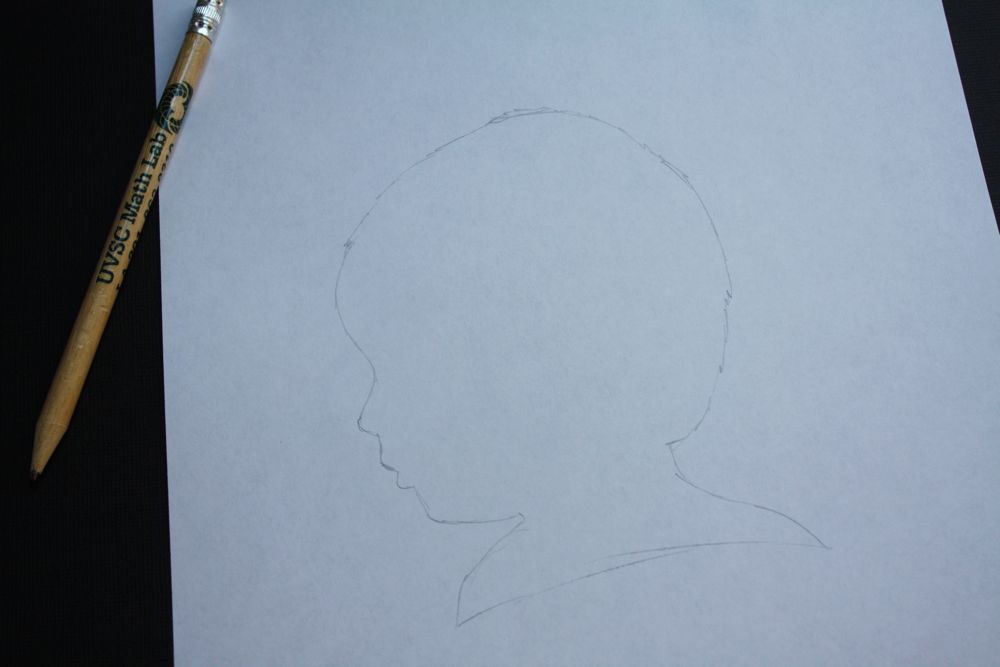
Silhouettes are so hip happening these days-and so easily customizable! well, here's the way i like to do them. simple, easy, and quick.
you'll need:
a piece of thin white paper pencil black paper frame
first, take a picture of the person's profile. (or your pet-even a favorite piece of furniture would look cool) then, print it out to the size you want.
trace the outline on the white paper (holding it up to a window works great) around the head and shoulders, make sure to get little hairs, etc. this makes it look awesome.
staple your tracing to the black paper-don't staple inside of your tracing!
then, carefully cut around your trace, catching all the little hairs and details.
tada, a cute silhouette!
then pop it into your frame of choice. soo cute, huh?
This is Sadie's baby one. aww my little conehead.
for reals! thank goodness her head looks normal now.
I love Halloween costumes. I love thinking of an idea, and hunting through thrift stores, my mom's attic dress up, etc for the perfect pieces to a costume. Sadly, the hubby does not get as excited-but he will still dress up as long as he's wearing "regular clothes". (so no giant crayon or whoopie cushion costumes, darn!)
I start pretty early thinking of ideas-like mid September ish. I've already got plans for this year-as long as the hubby ok's it. ;)
Last year we were a couple of cow folk and our little herd of one-my daughter Sadie. Our costumes cost a grand total of $3 or something like that. We borrowed most of the pieces, and I got her cow costume for $1. Gotta love that!
The year before that, we were a family of candy. I know, we're wearing t shirts. Give me a break-I had a new baby. lol. Sadie was a Hershey's kiss. adorable!
One of my favorite costumes to put together was this Hannah Montana outfit! I shopped around trying to find the most rock star-ish clothes I could find, and then made my hubby a I Love Hannah Montana shirt. That was his costume-he was my #1 fan! (said so on the back of his shirt)
Our first year as a married couple we went as Daphne and Fred from Scooby Doo! I made my outfit, and found some blue polyester pants for Rory. We added a stuffed Scooby Doo toy and were good to go. It only made sense as a couples costume I think though....the next year I wore it to work and people thought I was a stewardess. haha.
Whoa! Follow me back to the early 90's will ya? We had some awesome costumes growing up-sadly none I could find in my photos. I'm the one in the white dress-fairy princess I think? Anyways-the best part is my wand-made from a fly swatter, cardboard, and tinfoil. My mom gets points for creativity for that one!
Well, hope you enjoyed my little stroll through costume memory lane. Obviously I'm not above posting embarrassing pictures of myself to get a comment or two. :D
material-how much of each print depends on the size of your skirt-or your preference 3/4 inch non roll elastic matching thread sewing stuff (machine, scissors, rotary cutter is handy, etc...)
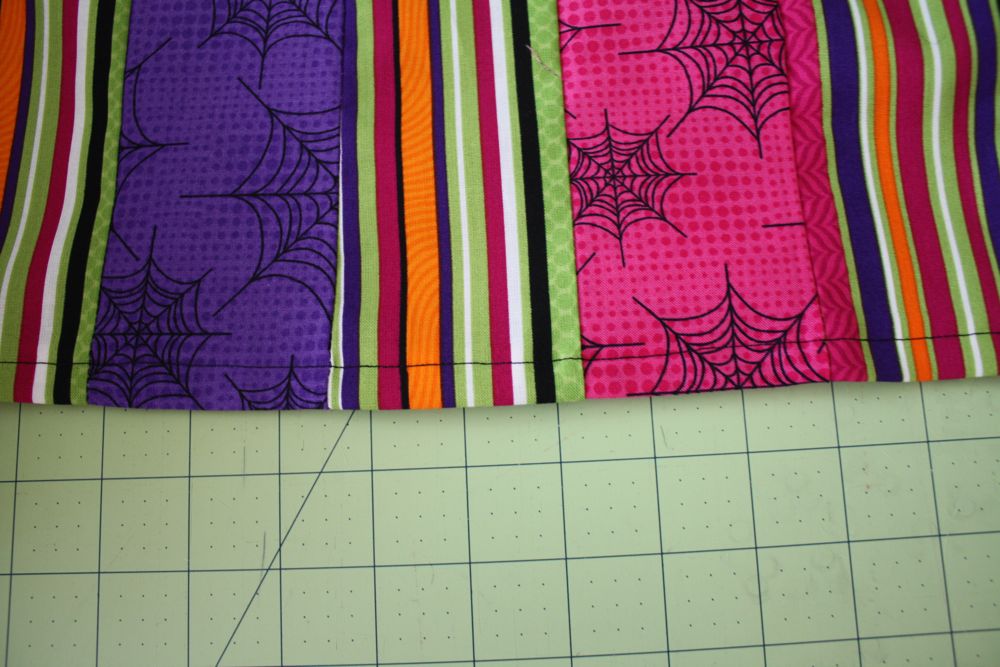
First, cut your strips-Mine were 13 inches long by 3 inches wide. You can make them longer or shorter or wider...depending on your preference and child. I ended up using 16 panels. Lay them out to figure out your pattern. Ignore that mine aren't lined up, please!
Sew all your pieces, right sides together, until you have a fabric tube, and press seams with an iron.
Now hem one side by ironing the edge over 1/4 inch...
and then 1/2 inch.
Sew around the bottom for your hem.
Now measure how wide your tube is, add 1/2 inch to that measurement, and cut out a piece of fabric that long by 3 inches for your waistband.
sew the short ends together.
make sure it fits your fabric tube, adjusting if needed.
now, pin the right side of your waistband to the WRONG side of your skirt piece.
sew around the edge with 1/4 inch seam.
now flip it up like so and press with iron.
press the top edge under 1/4 inch, and then fold over the seam on your skirt, like so..
tada all nicely pressed.
now sew along the edge, leaving an 1 1/2 inch space for the elastic.
cut your elastic to fit your child, then thread it through with a safety pin.
I like to secure the other end with a pin so it doesn't slip through. That's annoying!
sew the ends together, overlapping a little bit, with a zig zag stitch.
Sew the opening shut, and you're done!
pair it with a cute witch shirt-and you're in business!
I made this CA-UTE little witch shirt using the iron ons from SEI. They're insanely easy, you peel off the feature (eyes, legs, cauldron...) you'd like, and iron on a shirt-or bag-or whatever. You have to be gentle when you peel them off, but other than that they're super fun and easy to use! I chose to make a cute one instead of scary for Sadie cause I'm a wuss when it comes to scary things.