Piali here , today I have fun organizational project to share with you all.
Every year I reorganize my craft space round this time, as we all get lots of new craft supplies a little rearranging helps!
I always look for fun and affordable ideas.
Here is a project I created for my craft room...
I looooove owls.... so here is a fun pocket organizer!
I covered few of the chipboard pieces with Summer Woods paper using Mod Podge.
I also use the tumble Dye Blue spray to color in few chipboard pieces too.
I love the Denim sheet, it's like fabric...perfect for creating pockets!
To give my pocket a finished look, I applied tape adhesive on the back and folded the top edge. Then adhered the pocket with hot glue.
Assembled all the pieces and pocket to complete my organizer.
Looks cute...isn't it ?
I will hang it on the wall.
The pocket is perfect for storing, pencils, note pads and more...
Piali here, today I'm sharing a project which is great for planning & organizing!!
I'm a card maker and I'm slowly stepping into the scrapbooking world... I find sketches very useful for my creations. Sometimes I draw my own sketch or I pin the sketches I like over at pinterest. When I'm creating especially layouts, I like to have sketch on my desk. So I created a sketchbook for me!
Today I would like to share my new Sketchbook with you all!!!
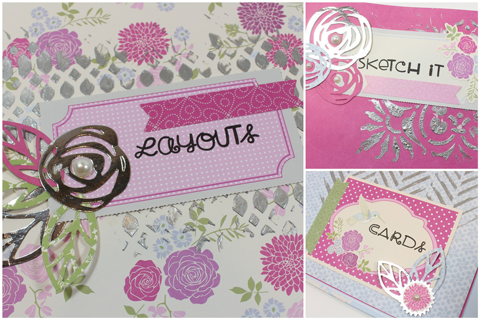
I used some embossing paste for the background. I also used diecut flowers & pearls from Sundries pack and few stickers from Club SEI January Paper-crafting Kit.
I love the cover of the album. Its not only pretty but very useful too! Here is the inside of the album.
I adhered a page pocket (included in the kit) to the inner side of the cover to create a pocket for the notes. I attached a tab sticker for easy pullout.
The first section is for Layout sketches... I labelled it using the perforated labels.
I embellished with embossing paste, diecut flowers and stickers.
At the back of it I created a pocket by simply adhering paper and embellishing it with stickers. I'm using the pocket for storing color combo swatches.
Now here is close up of how I save a my sketches. I simply created a word document and insert small pics of the sketches I like and print it for future reference. The three binder album is perfect for adding new pages whenever I need.
Next one is for my fave card sketches...
Again I created a divider page and labelled it using perforated labels from the kit.
I used same method to print the card sketches.
The last section is for my own sketches...
I printed a blank table for this section...I can easily draw my own sketches here.
Hope you like my sketchbook idea! I love the pretty SEI papers, embellishment and the albums, they make creating a breeze!!!
Thanks for stopping by..
Happy Crafting.
Thanks,
Piali
Hi Everyone! Laurie here today with a cute and easy craft that will help you keep your life a little more organized. If you're like me, your fridge is covered in little notes that remind you of all the things you're supposed to be doing during the week. It works, but it certainly isn't pretty! That's why I decided to make a magnetic message board (which can also be displayed on a stand!) to help prettify my life a little.
For this project I used SEI's Furry Friends collection. Even though it's animal themed it's still very versatile! I love the bright colors and that cute cat die cut!
You can see on the back of the frame I glued neodymium magnets. These are small but super strong. A dot of gorilla glue keeps them in place nicely. Now I can attach the frame right to the side of my refrigerator!
Because of the glass in the frame, you can use a china marker or a dry erase marker to make notes that will later wipe off quickly and easily. Much cuter than post-it notes or a whiteboard, don't you think? I love the cute little gemstones from the Furry Friends Sundries pack; everything is better with sparkle!
You can do this project with any of your favorite SEI collections -- and I would love to see it if you do! Leave me a comment below so I can see what you're up to!
Hello SEI Fans!! Happy New Year!! Piali here… sharing a calendar project with you all.
We all need new calendars for each year, a mini calendar is always perfect for our pocketbook.
So here is fun little 2015 calendar idea…
I started by printing out a mini calendar… I used one of the many free downloads from internet. The size of my calendar page is 4.5 X 4.75 inches. I stapled all the pages to a 4.75” X 5“ piece of Patterned paper from Calling Birds collection.
Cut 12” x 5” of a patterned cardstock. Score and fold at 2” & 7.25” to make the calendar cover. Punch two holes and thread twine thru it (as ahown in photo) then adhere the calendar pages inside.
Now comes the fun part… embellish it.
I used the die-cut and stickers from the Calling Birds collection. I also added a die-cut snowflake and numbers for the year 2015.
Here is the finished pocket calendar project…hope you liked it!! This will make a great new year’s gift! Thanks for stopping by..
In the ever expanding goal of organizing my craft space (okay, let's be honest--my desk), I'm always thinking of ways to better store my crafting tools and display little notes to myself about a project or what to buy at the crafting store on my next trick. Once again SEI and a small buy at Target save the day!
I purchased this adorable desk top caddy that has four spaces to store tools, and then embellished two sides.
I adhered a little cork board to the side and embellished some thumbtacks with papers from The Mia Bella assortment pack. On an opposite side I adhered SEI's chalkboard paper, so I can make little notes to myself, and erase them when need be.
Try and find practical uses for your crafting product. This is chalkboard paper from March's Papercrafting kit. I trimmed it down and added it to the side. Don't forget to add embellishments for added flair!
Yeah, I'm not much of a scrapbook layout girl. I think I can count on both hands the amount of layouts that I have made over the last year. That being said, I do enjoy hoarding 6" x 6" paper pads. The size is perfect for the majority of small scale projects that I create, and they're easy to stack on top of one another. The only problems with my paper pad and embellishment addiction is making the paper pads accessible, but also storing them nicely in our office shelving, since I am moving the craft area to the office area.
Well, I could shove them in a box, but then I would forget that I had them. I could put them in a clear container, but plastic bins are ugly. So, I turned to my Lexington Card making paper pad from SEI, and voila, an epiphany hit me! Use the gorgeous paper in my favorite collection to design a tabbed divider system that can be used with small baskets. Not only will the baskets fit in the office shelving, but I can switch out the papers from season to season.
First, I gathered and trimmed all my papers to fit inside some baskets that I found at Michael's on sale for 40% off. I trimmed them slightly larger than the inside of the basket, so that when I die cut them, they'd fit perfectly in the basket. Since the tabbed cards file that I cut from had more of a horizontal orientation, I transformed it in the Silhouette software program to fit my basket.
I had a lot of SEI embellishments and paper pads that needed a new home and they fit nicely in the baskets. I decided that the best way to organize paper from one manufacturer was to divide them up by release dates, starting with the most recent collections in the front. One basket is full of SEI paper pads and embellishments, and the other is basket are various paper pads from other companies.
Organization should be simple, yet effective. The best part of this Get it Together solution is that it took me less than 20 minutes to make, and it's a great way to use your larger scraps of patterned paper.
I don't know about you, but I like to take advantage of any opportunity to organize and clean that I can find. Tidying up, labeling and making sure the house is in order, is a neurotic trait that my dear husband claims is one of the many reasons why he fell in love with me. Hmm...is that a good thing?
In my quest to the get my craft room together, I noticed that I have a lot of loose bits of paper laying around my craft table, on surrounding shelves, and basically strewn about the place. Some of these loose papers actually had important information on them that could have been...ugh, useful if I had known where they were at the time. It's amazing the things you find when you're cleaning, things that you didn't even know were missing!
For today's Get it Together post, I created the perfect solution to my craft room dilemma; a chalkboard memo board using paper from SEI's Mia Bella collection.
All the materials used to create my memo board were supplies that I found while I was purging my craft room. Ha, who knew all this prettiness was so easily accessible to me? I painted some clothes pins with white acrylic paint, and covered them with strips of Kiss in the Rain, Sightseeing, and Hotel Suite paper, and adhered them to the painted wooden plaque.
Since, I needed an area where I could write notes, I pulled out my chalkboard paint and applied two even coats to the wooden plaque. To make the chalkboard lines super straight, I masked the edges with washi tape. Make sure to paint the first coat of chalkboard paint in one direction, and the second coat in another direction. And, if you're like me and simply can't wait the 24 hours required in-between coats, (Who are they kidding? No one is going to wait 24 hours in between coats), pull out your heat gun and dry the paint in a snap!
Ooooh, it looks like I need to submit some cards, better pull out my other lovely SEI paper collections for the next call.
Okay, so why is that all desire to purge, clean and organize my craft room always occurs in the middle of the night on a wednesday? I don't get it. But, far be it for me to deny my craft room of the annual spring cleaning that it so desperately needs. After hauling out boxes of unused product to be sorted, organized and stored in my classroom storage closet, (or to avoid dealing with the excess craft product), I surveyed the space and discovered a very important truth. How do I organize and store what's left? Simple....use craft products like patterned paper to organize all the teeny little paper-crafting products that don't have a home or tend to get lost in the whirlwind that is our crafting.
SEI's newest release, Mia Bella was made specifically for my craft room. My husband loves maps, globes and all things of the nautical navigation. When we got married he graciously offered (eeehh--mm....was forced) to move his map and navigation decor into our office, which is now our shared craft room/office. I am moving my craft area into the office part of our shared space, so storage solutions need to be appealing and accessible, for which the Mia Bella is perfect for. Mia Bella features some beautiful vintage map paper like Kiss in the Rain and Sightseeing, which will not only store my products, but will also blend perfectly with the map decor on our office shelves.
I decided that I needed some small boxes to hold tiny trinkets, embellishments and bits, that tend to get lost in larger drawers or cubbies. The one and two-drawer boxes are cut files from the silhouette store, and can be sized perfectly for whatever type of storage that you're looking for.
The perfect thing about the Mia Bella collection is that it's elegant, it showcases soft and muted colors that can work with any decor, and that it's full of such beautiful patterns, that you're not going to be able to stop using it, especially once you realize how easy it is to create these miniature storage boxes for your crafting goods.
Since, I like options, I needed two different storage solutions, one for larger SEI embellishments like chipboard pieces, and a smaller two-drawer for little trinkets like brads, buttons and little sundries bits. The boxes stack nicely together, but can also be stored side-by side.
Stop by my blog for tutorial and tips on how to assemble the one and two drawer boxes.
Wow! It's almost a full month since Christmas! Have you been playing with the cool new gadgets you found under the tree?
Were any of you lucky enough to receive a NOOK HD tablet on Christmas morning? It's perfect for families because you can have up to 6 profiles (one for each family member) and it's budget-friendly at $199!
Today we thought we'd share our favorite ways this fun little device can help keep those New Year's resolutions & help you get organized:
1. Keep track of inspiration. If you run across a magazine or catalog page that inspires you, save it in your "scrapbook" and read later.
2. Use the Pepperplate app to plan your recipes, menu & cooking. Eating at home is healthier and costs less too!
3. If you have kids or grandkids, let them watch a movie or grab a fun game app to keep them busy for a minute while you finish a craft project on your list. Use those 6 personalized profiles to make sure your kiddos can only access what you want them to. :)
4. Use the house cleaning list app to keep your house clean this year. Be ready for guests & no more playing catch up!
5. Send a greeting card. Use the greeting card maker app to tell someone you love and appreciate them.
6. Cut down on clutter by reading your favorite magazines, newspapers, & books on your device!
How are you doing on your New Year's resolutions? What would you use the NOOK HD to help you with?