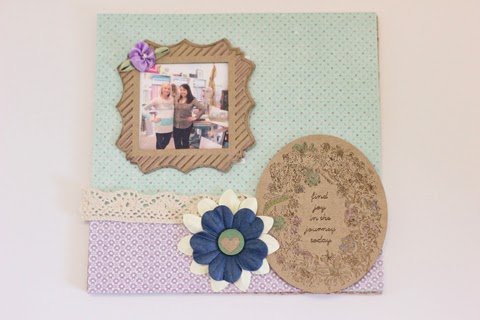
Hi Everyone! It's Thuy from My Paper Pinwheel sharing with you a fun Corkboard Photo Display idea.
For this project, I started with a 6x6 corkboard square. I then used two different sheets from the Pembroke 6x6 paper pad. The good thing about the corkboard and the paper being the same size is no trimming needed.
I used two different sheets and layered them on top of each other. I then used some of the kraft chips from the Pembroke line and to use as additional embellishments to my photo display including a pre-cut frame to outline my photo.
I finished the projects using the Pembroke sundries flowers and some lace trim. This is such a cute little project to gift to a friend or event send in the mail for a fun surprise.
Hi Everyone! It's Thuy with My Paper Pinwheel and I am back with a two easy cards that took me less than 5 minutes to create!
I was running out of time and needed a birthday card for a party I was getting ready to attend. I knew I did not have time to run to the store so I pull out my SEI Hooray Birthday Card Kit.
I was so surprised how easy it was to create several different styles of birthday cards. They even included design options so if you were having a little bit of creative block, you could simply follow their examples and recreate the card in no time.
I love the convenience of the kit and I will be using it again when I need to a create a card.
Spring time is such a busy time of the year for me with birthdays and various celebrations that I like to keep gift tags available to use for my gifts. I don't always have time to buy store brought cards or tags so I make my own using various types of patterned paper.
I used the Pembroke 6x6 paper pad to create some fun tags for summer. I simply took a tag I had and used it as a template to trace and create more tags. I then used a single hole punch and created a hole at the top of my tag and used twine to hang them.
In just a few minutes, I created a handful of tags that I will be able to use for gift giving.
Hey Guys, it's Thuy again and I am sharing a fun to display for photos! I had some leftover cork board squares from a previous project and I thought they would make adorable frame to display my photos.
Using the Perfection line, I cut two pieces of strips big enough to cover my entire cork square. I then used some left over yellow ribbon and glued it to the center of my square.
I then punch out a few of the pre-cut butteries and taped them on. I used tape versus glue so I can easily switch the embellishments up depending on the photo. I then used a glittered clothespin and attached a photo.
It's is a quick and easy project and would make for a such a fun gift too!
I am so excited to finally see Spring and warmer weather approaching! One of my favorite things about Spring is the blooming of all the flowers. I love using the Perfection line to embellish a fun Mason Jar Vase to add a little Spring decor to our home.
One of my favorite elements of this line is the die cut butterflies. I love the various colors and shapes!
To create a fun embellished Mason Jar Vase, I simply cut a strip of one of my favorite patterns and wrapped it around my mason jar. I then use various sizes of the die cut butterflies to add some additional flair! Super easy project and it makes for such a cute home decor. Happy Spring!
Hey Guys, it's Thuy again with a quick and easy card solution when you are short on time and need a quick fix!
I love creating a card versus purchasing a store brought card. I feel like it is more personable and it reflects a part of me.
I am totally digging the new Azalea line. It has so many fun girly patterns and awesome quotes. I used a standard 12x12 sheet of paper and trim it to a size of a normal card. I then used some of the perforated cards and layered them on my card. I then finish the card with some extra ribbon I had left over from a previous project.
Super simple card that took me less than 5 minutes to create and the quote was perfect for the occasion! Who doesn't love a easy yet cute card? Have fun creating!
Hi Guys, It's Thuy and today I am sharing with you a fun project using the new Catalina Line. I am in love with this new line! I love the colors of all the papers and embellishment but I think my favorite item is the white lace trim.
I am not much of a layout type of girl but I love to use paper products in a different way. The kit came with a 12x12 perforated sheet that had 12 little cards. Some of the cards had sayings and some where blank. I use 4 of the little cards and created a cute mini album.
I basically, gathered the four cards I wanted to use and added a hole punch in the left corner and used a ring to keep it together. I then embellished each page using various stickers and trims from the Catalina line and I love how turned out. Simple and sweet. I could easily add various photos or use it as a mini journal to document special events.
With the holidays almost over and Valentine's Day coming up quickly, I created some fun Valentine's Day tags and matching cupcake toppers.
Using the 12x12 paper from the Chalet line, I punched out mini hearts to use for my tags. I then used my washi tape as an embellishment on my tag first.
I layered my tags with my mini hearts and rhinestones and finished it off with baker's twine so they can be used as gift tags or even as a embellishment for a scrapbook page.
I also created some fun cupcake toppers to coordinate with my tags by using the same washi tape and food picks. This is a super easy project that would take no one to make!
I love embroidery hoops and how they can be used in various ways! For this project, I used the SEI Iron on Art Flocked transfer and my Alphabet Die Cutter and cut out the letters for my name.
I then followed the simple instructions and iron on my letters to my muslin fabric.
Once it was finished, I placed the fabric in my hoop and finished it off with a simple bow. This would be such a fun gift to make for as a gift too!
I can't believe Christmas is just around the corner! My favorite part of the holidays is wrapping all the presents. I like to make sure my presents stands out from the crowd. I love working with a lot of neutral colors and kraft boxes so I knew the Chalet line was the perfect embellishment.
I took a simple kraft box and cut out a rectangle using the Chalet back country paper. Aren't the red foil deers so cute!
I then use a square from the My Cozy Quilt paper to add some wordage to my package. I took two cardboard textured stars and used red ink on all the edges to add some additional color. I then used of the twill from the Chalet line and hand stamped the word "Merry" on there twill and stapled it onto my package to add more of a rustic look. I finished the packaged with another My Cozy Quilt squared and attached it using the baker's twine. I love how the finish packaged turned out.
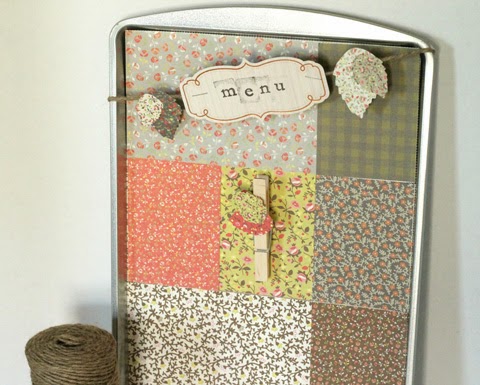
I love that fall is finally here and I can get back to more meal planning with my family. I used products from the Yesteryear line to create this fun Cookie Sheet Menu Board to display in my kitchen.
I took a simple cookie sheet that I picked up from the Dollar store and used paper from the Yesteryear line to create a patchwork background and glued it on to my cookie sheet. I then used the Yesteryear fall flurries die cuts and hand stamped the worked Menu on to one of the accents and attached it using natural jute. I then took a regular clothespin and embellished it using some of the leaves in the fall flurries package.