I had so much fun creating this fun wreath for a workshop that I did at our local public library this month! The ladies that attended had all different levels of crafting abilities...some had never used a paper trimmer before, and I'm happy to share that they all left with a beautiful wreath and were so happy! We had fun too of course which is always an added bonus!
To create this wreath I used a foam floral wreath form that was 10 inches (I found them at our local hardware store in the craft department for $2.99), patterned papers cut into 1 1/2 inch strips (I used 22 strips for my wreath), doilies, buttons and adhesive! I used scissors to cut the little notches at the ends of the paper strips when I was done adhering the strips to the wreath form and I was done!
I loved this project...it's a fun one to do with friends and you could change it up for different seasons so easily simply by switching up the papers you use! I know that I will be making more of these in the future.
I've included some pictures from the workshop I had...everyone used papers from SEI's latest collections. Do you have a favorite?
Supplies Used:
Patterned Papers from the collection Spring Picnic
foam wreath form doilies
adhesives
buttons
It's Rhonda Van Ginkel here today guest designing for SEI! Today I have a few card creations to share with you that I hope you enjoy. I loved working with the Spring Picnic collection for these.
My first card features a sentiment from the sentiments sheet which is so extremely versatile and perfect for card making or adding a journaling spot to your page. I trimmed the scallop piece at the top from the strip of the page as well. I used the
I used the yellow ric-rac from the Forever Sassy Sundries as well as the sweet little bird and branch are from the Basics Die-Cut Elements. The die cut elements are just adorable!!! the little vellum accents added a nice subtle touch as well.
My next card is a more clean and simple design. I cut the base from the Spring Breeze - Clear Skies paper. The next layer is from Spring Breeze - Grandpa's Handkerchief. I used a circle die and cut through the top of these 2 layers
Next, I lined from behind with the Mother's Perfume paper. My blue circle layer was cut from the "Hoo's Sweet" Sundries packaging, followed by a Basics Die Cut Accents #1 sentiment.
I finished the card with a paper bow and banners that were cut from some dies that I have.
These two creations give me a little bit of spring fever, I hope they do for you as well!
Thank you so much for having me as a guest designer here at SEI, it's been an absolute pleasure!
Greetings! It's Rhonda Van Ginkel here today to host the blog as a Guest Designer. I was so honored to get the chance to work with some fun products!
I created a page for you today featuring some really beautiful papers from the Neon Vibe collection along with some Paper Doilies and Sundries. The pretty envelope was the perfect anchor to my design, it's been embellished with a bit of modeling paste and sprinkled with a variety of mist colors.
Do you ever take photos of the signs for places you visit? I never used to until I began scrapbooking. Sometimes those images really help give a bit of fun design to your page. That's what I decided to do here.
I adore the sequin ribbon in the Hoo's Sweet Sundries pack and used it as an anchor on the bottom of the envelope. The large paper clip is from the Forever Sassy Sundries pack. The die cut elements are just perfect to finish your page beautifully!
Thank you so much for the opportunity to design for you today. I'll be back tomorrow with a bit more inspiration for you.
Have you seen the Club SEI April kit preview yet? We think you're going to love it! Check it out...
Isn't this a fun kit? So many things about this kit make us happy: pretty vintage patterns, cheerful colors, vellum die-cuts, mixed alphabet, washi paper, wooden shapes, felt strawberries...
In keeping with tradition, we would like to giveaway one of these kits. Ready, set, good luck!
Hi! It's Kelly here today sharing a layout using the Hoo's Sweet collection. It's perfect for spring-y photos...or even just everyday outdoor adventures. For this page, I'm using it with a photo of a cute little toad that my girls found in the backyard.
I started by cutting a piece of one of my favorite patterned papers from the collection down to 8.5x8.5, and adhering it to an 8.5x11 sheet of white cardstock. Next, to kind of match the theme of the photo...I chose a green patterned paper, and trimmed it down to 4.25x10. I stitched it down on the right side along with a doily border.
I layered my photo with 4 of the Playful Expressions cards, and topped with my embellishments, title, and journaling. I added an inch of glitter paper to the bottom of the page, and finished it up by stitching down some flowers along with a strip of patterned paper.
Hi there! Easter is on its way, and before you pick up the same-old Paas coloring kit, you might consider another kit to decorate your eggs this year: the Club SEI March card making kit.
One of the things I love about the Club SEI kits is that they come with a full collection of supplies that can be used countless types of paper crafts. You're not limited to the type of project that is the focus of the kit. The March Neon Vibes collection has bright colors, bunnies and blooming flowers ... perfect for spring and Easter crafts.
I made these Easter egg decorations using the oh-so-cute die-cuts, stickers and Build a Butterfly pack included in the kit. The decorations are attached to paper wraps, so you can make the decorations ahead of time and then set up your display on Easter.
Simply slide the hard-boiled egg into the paper wrap when you are ready to put them out on your table. I trimmed the yellow cardstock in the kit to 3/4 in. by 6 in. to make a wrap that fits a standard-sized large egg. Mini "baskets" of cupcake wrappers and Easter grass complete the display.
How will you be decorating your Easter eggs this year? What creative, non-card-making projects have you made using your Club SEI card making kits? We would love to see your projects! Share a link in the comments below.
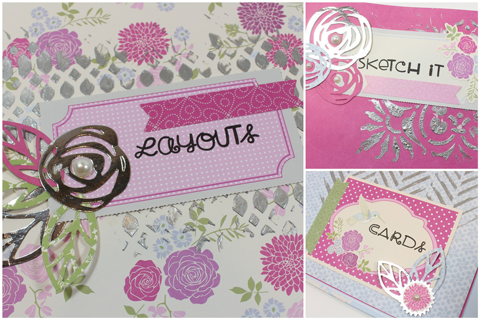
Piali here, today I'm sharing a project which is great for planning & organizing!!
I'm a card maker and I'm slowly stepping into the scrapbooking world... I find sketches very useful for my creations. Sometimes I draw my own sketch or I pin the sketches I like over at pinterest. When I'm creating especially layouts, I like to have sketch on my desk. So I created a sketchbook for me!
Today I would like to share my new Sketchbook with you all!!!
I used some embossing paste for the background. I also used diecut flowers & pearls from Sundries pack and few stickers from Club SEI January Paper-crafting Kit.
I love the cover of the album. Its not only pretty but very useful too! Here is the inside of the album.
I adhered a page pocket (included in the kit) to the inner side of the cover to create a pocket for the notes. I attached a tab sticker for easy pullout.
The first section is for Layout sketches... I labelled it using the perforated labels.
I embellished with embossing paste, diecut flowers and stickers.
At the back of it I created a pocket by simply adhering paper and embellishing it with stickers. I'm using the pocket for storing color combo swatches.
Now here is close up of how I save a my sketches. I simply created a word document and insert small pics of the sketches I like and print it for future reference. The three binder album is perfect for adding new pages whenever I need.
Next one is for my fave card sketches...
Again I created a divider page and labelled it using perforated labels from the kit.
I used same method to print the card sketches.
The last section is for my own sketches...
I printed a blank table for this section...I can easily draw my own sketches here.
Hope you like my sketchbook idea! I love the pretty SEI papers, embellishment and the albums, they make creating a breeze!!!
Thanks for stopping by..
Happy Crafting.
Thanks,
Piali
Hello! It's Kelly here today sharing a layout made with the Hoo's Sweet collection.The greens in this collection are perfect for St. Patrick's Day projects, and boys, and feeling lucky.....or maybe green is just my favorite color ;)
I started this page by trimming a piece of patterned paper down to 8.5x5 and adhering it, and a border to a sheet of 8.5x11 cardstock. I stitched that down, along with an 1.5 inch piece of patterned paper to the bottom of the page.
After sticking down my matted photo, I tucked a journaling card under the border to the right of the of it. I then added my embellishments, title, and journaling. I finished it off by adding some googly eyes to my owl, and stamping the date.
Have you seen people using this fun notched banner design on their layouts lately? I have to say that I'm liking the trend.
To create the look for this layout I free-hand cut a notch on one paper that I had trimmed up already to the size that I wanted and then cut a sheet of the same shape a bit smaller from vellum paper and layered the vellum over the top for a lighter feel. I used the cut for the backdrop to my layout and added my photos and other goodies on top.
I thought the papers coordinated perfectly with my photos...I used the Forever Sassy collection (an easy new favorite of mine!) and I love how it turned out!
Hello!
Today I'm sharing a layout using Forever Sassy scrapbooking kit.
This collection is absolutely gorgeous!!!
I also used some Silver Foil cardstock and Silver Washi tape.
Die-cut overlays are fabulous...they come in variety of styles, perfect for any layouts or cards. I used the perforated sheet for my title ...love the prints!
The sticker sheet has lots trendy icons as Gems, feathers, arrows and more.
The kit also includes vellum sheet...I used it to die cut some feathers.
The most fun thing in the kit is the decorative tape runner!!! I love it! It's super easy to use and looks amazing!!
Lately I've been enjoying creating cards...for this card I challenged myself to create a card using scraps from another project that I created. The two small strips of border stickers along the card's edge were scraps from a layout that I previously had created. I used my sewing machine to add a bit of zig-zag stitching to the top of one border sticker for some added definition to my card. It's funny how something so simple can really add a lot to a project!
I used one of the die-cuts from the Forever Sassy collection to frame a scrap of paper and then added a small heart sticker to add a little something to the card. You can see that I added a bit of 3d adhesive to adhere the heart to make it pop.
I used the paper Over the Taupe from the Forever Sassy collection which is double sided paper and for the card I love that the inside is a pale aqua color...you can see it peeking through in one of my photos. An added bonus!
Have you made any cards lately? Perhaps challenging yourself to use up those scraps will get you going!


.png)


